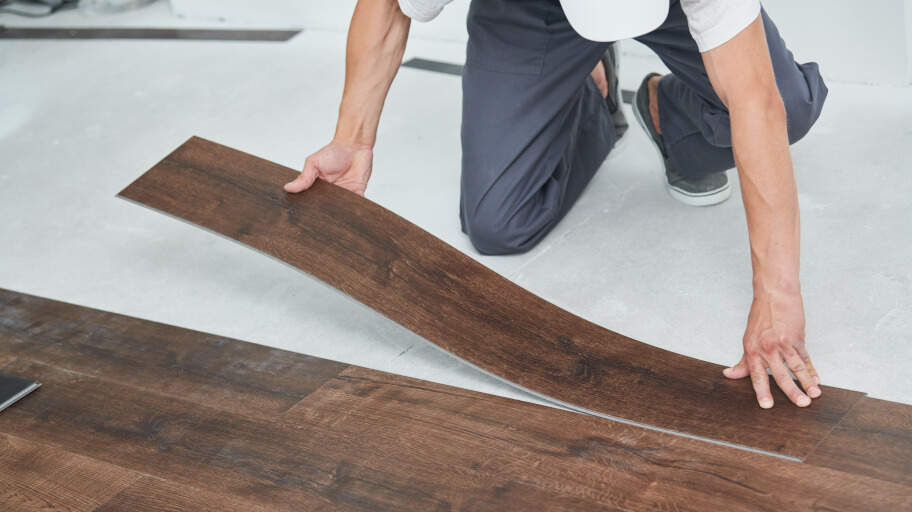
Whether you are looking for the cosy and warm look of wood planks, you are a fan of the herringbone floors, or you simply want to refresh the interior of your home, vinyl flooring is a great choice to opt for. Vinyl floors are water-resistant, durable, and easy to clean and maintain. Plus, another great thing about laying vinyl planks is that you can do it yourself!
If you have decided on having this type of flooring, keep reading because we have created this vinyl flooring installation guide to help you with the whole process and make your job as easier as possible.
In this article:
How to decide on a vinyl plank flooring based on installation?
One of the main reasons homeowners in Australia find vinyl planks attractive is the versatile way of installation – floating, glued down and loose lay are the main options. There are also the self-adhesive types of planks, also referred to as Peel and Stick. As the name suggests, they come with a very simplified installation process that does not require that much effort.
However, it’s important to keep in mind that every home is unique and different installations work differently for each place. To determine if a specific type of installation might work better for your home than another, find below the specifics on how to lay the vinyl floor in versatile ways, along with their pros and cons.
Floating vinyl flooring
This method, which is also known as interlocking installation, is available for other types of flooring, such as laminate and timber. It is suitable for subfloors with imperfections. Here, no adhesive is needed because the planks are simply locked together, making them very easy to remove without damage to the surface below.
Pros:
- Quick installation
- Easy to remove in comparison to other methods
- Walk on straight away
Cons:
- Not very suitable for high-traffic areas
- More difficult to replace a single section due to the interlocking mechanism
Glued down vinyl planks
If the room where you plan to install the vinyl flooring is a high-traffic area, you will need flooring with a more secure hold. In this case, the glue-down vinyl flooring method is an option to consider since the glue provides extra support and makes it more permanent.
Pros:
- Ensures secure hold
- Perfect for high-traffic areas
- Inexpensive to buy
Cons:
- Requires pressure-sensitive adhesive
- More difficult to remove than the other two installation techniques
- More time-consuming installation process
Loose lay vinyl planks
Often preferred, these types of planks are among the easiest to install. There is a rubber material covering the back of the planks that creates friction with the surface. This is what secures the floor in place and does not allow movement, even without glue or nails.
In some cases, adhesive can also be added for even more stability. This is usually done when the base of the walls are damaged or uneven and do not provide strong support around the edges of the flooring.
Pros:
- Durable
- Waterproof
- Very easy to install and remove
- Easy to re-installed in a different place
Cons:
- Needs to acclimate before installation
- Improper laying can compromise the durability and waterproof features
- Not very suitable for high-traffic areas
Peel & Stick vinyl planks
Known also as self-adhesive vinyl planks, they come with an easy and quick installation, making them an excellent choice for many. The specific feature of the Peel and Stick planks is that they have an adhesive backing that sticks to the subfloor and prevents the plank from moving. This makes them suitable for an area with a decent amount of traffic.
Pros:
- Quick and easy installation
- No need to work with additional messy glue
- Easy to remove without damage to the subfloor
- Walk on straight away
Cons:
- Water can seep through cracks and edges
- Needs flawless underlayment
Is it better to glue down or float vinyl plank flooring?
Most homeowners find that the self-adhesive and loose lay vinyl floor installations are the easiest since they require minimum effort and skill, while also guarantee some stability for the flooring.
The glue down and floating planks methods are also possible for do-it-yourself projects but can be a little more time-consuming and complicated for homeowners. And depending on the specifics of the room, chances are your will likely require professional help at some point. If you have to decide between glue down or floating vinyl flooring, it comes down to whether the area will receive a high amount of foot traffic.
The glue-down method is considered a permanent choice—it is more durable and withstands pressure better. On the other hand, the floating vinyl flooring can be slightly easier to lay yourself, but then, you may notice sound and movement in the planks over time.
Also, if you plan to replace just some of the planks in a middle section at some point, you will have to take into account that they are more difficult to remove. Because of their interlocking system, you will need to remove the planks systematically until you reach the area you want to replace.
Preparing the area for the vinyl floor installation
What is great about vinyl floors is that they can be installed easily over your old floor. However, you will still need to spend some time preparing the area for the installation.
- Leaving the planks in the room for 48 hours to acclimate – vinyl planks can change dimensions depending on the temperature and humidity.
- Removing old flooring – in some cases, you may need to clear your badly damaged old floor (if needed).
- Cleaning the area – the surface will need to be dust-free and dry.
- Removing any trim work – such as quarter rounds or shoe moulding, and if removing an old carpet, make sure to remove the wooden skirting board.
- Levelling the area – ensure that there are no lumps and imperfections and the area is flat with the help of a spirit level. You can sand down high spots and apply a ‘skim coat’ to fill in any gaps.
- Adding underlayment – if installing vinyl planks over concrete subfloors, you will need to add underlayment to soften the floor, avoid any risks of moisture build-up, insulate it during the colder months and soundproof it, as well. If your subfloor is wooden or you have an existing floor, an underlayment is not necessary, but it can help with sound reduction and add extra cushion.
- Determining the layout – Take into account the shape of the room, any special features of the room and, of course, your personal preferences. It is always a good idea to have some extra material just in case.
How to lay loose lay vinyl planks
Like we’ve mentioned earlier, this is one of the simplest and easiest methods to install vinyl flooring. Still, there are a few things to keep in mind.
Tools and materials:
- String/chalk line
- Paint/floor roller
- Tape measure
- Razor knife
- Adhesive (optional)
Step-by-step process:
- Planning the layout – To determine the layout of your planks, place them according to your preferences and see how they fit the room.
- Calculating – Measure your space and calculate how many full planks you will need and whether you will have to cut some of them to fit the size and shape of the room. Use a string or chalk line to run the length you will want to follow.
- Securing the floor – You can use pressure-sensitive adhesive for loose lay vinyl (if you want to) to secure the hold of the planks and prevent them from moving. Apply the adhesive with a paint or floor roller. Keep in mind that the glue is white when applied, but it will go clear when it dries.
- Laying the planks – Start installing the vinyl planks one row at a time following your string line. To create a professional, look it is advisable to install the planks without any gaps. There is no need to leave space for expansion, as with other methods.
- Enjoying the result – Once the whole floor is covered, you are ready to sit back and enjoy the results of your hard work.
Laying self-adhesive vinyl planks
The process does not differ much from the previous one, except you won’t have to look for glue, as it’s already applied on the back of the purchased planks.
Tools and materials:
- String/chalk line
- Tape measure
- Razor knife
Step-by-step process:
- Planning accordingly – Lay a couple of planks without removing the tape on the back to see what pattern will fit the room best.
- Calculate – Measure your space and calculate how many planks will be needed to cover the entire space. You can cut some of them to fit them where necessary. Use a string or chalk line to run the length you will want to follow.
- Install the planks – Remove the tape on the back of the planks and start laying them in a row one by one, following your string line. Press with your hands to secure every plank perfectly in place and make sure there are no gaps.
How to install a floating vinyl plank flooring
Floating vinyl floor installation is not that hard. Still, be patient because the task may prove time-consuming, as each plank needs to be correctly interlocked with the previous one.
Tools and materials:
- Table saw/circular saw
- Tapping block
- Rubber mallet
- Tape measure
- Pull bar
- Razor knife
Step-by-step process:
- Laying the underlayment – Unroll the underlayment along the longest wall and cut it to fit the room. The next sheet should slightly overlap with the first one. Some underlayments come with a self-adhesive strip, but if yours does not, you can use tape to seal the layers.
- Determining your layout – You will need to plan in advance the way you want your final floor to look and calculate whether and where you will need to cut some of the planks.
- Laying your vinyl planks – Place your first piece and connect it to another using the locking tongues. Make sure they fit flush using a tapping block and a rubber mallet. There shouldn’t be any gaps between the boards because this can cause problems when laying the rest of the planks, making the whole floor unstable.
- Measuring the last piece of the row – Using a tape measure and a carpenter’s square, determine the length of the last plank. Use the saw to trim the edges, if your plank does not click evenly, and then finish up with the pull bar and the rubber mallet to secure the last piece.
- Laying one row at a time – Installing vinyl floating plank flooring needs to happen systematically. When needed, cut the planks to fit the shape of the room and its features. If a plank simply does not want to click in one place, check the grooves. It is possible that something has stuck inside the groove. You can use a razor knife to remove it.
- Placing weight on the installed planks – Use objects with some weight to prevent the pieces that have already been installed from moving. This can happen when you use a rubber mallet, for example.
- Finishing touches – Once the vinyl flooring planks are installed, make sure to check that they are secure one last time with your pull bar and rubber mullet. Now, what’s left is to nail on your shoe mould or quarter round, and you are ready to enjoy the results!
Opt-in for an expert floating floor installation service today!
Contact usFor questions about the services we offer visit our main site.
How to install a glue down vinyl plank flooring
Now to the toughest part – laying vinyl plank flooring with glue. You will need a few tools and materials before the actual work can begin:
Tools and materials:
- String/chalk line
- Table saw/circular saw
- Tape measure
- Razor knife
- Trowel
- Three-section floor roller
- Adhesive
Step-by-step process:
- Deciding your layout – Place the vinyl planks around your space in the desired pattern. Make sure they are all laid in the same direction.
- Measuring the room – Calculate how many planks you will need and how many you will need to cut to fit in specific areas in the room. Place a string or chalk line to make following the length of the room easier.
- Applying adhesive – The manufacturer will let you know what adhesive will be needed precisely. Follow the instructions provided by them. Give some open time to the adhesive, then apply it with a trowel, following the string line.
- Laying the planks – Place the planks before the glue goes clear. Install the planks following your preferred pattern but make sure you place them in a way that avoids clustering the end joints. Complete each area before beginning the next.
- Securing the hold – Make sure you don’t walk on freshly laid planks. You can go over the glue down vinyl plank floor installation with a three-section floor roller to secure the planks to the subfloor.
- Last touches – It is not advisable to wash the floor up to 48 hours after the installation. After 48 hours, you can use a vinyl cleaner to remove any dirt from the surface and enjoy the look of your new vinyl floor.
Takeaways
- Vinyl plank flooring is durable, fairly easy to install and water-resistant.
- There are four main vinyl installations – floating, loose lay, glue down and Peel and Stick.
- Installing Peel and Stick and loose lay planks are the easiest technologies.
- Laying floating and glue down planks is also possible as a DIY project, but more time-consuming and messy.
- Of course, if you don’t have the tools and the skills to lay your vinyl flooring by yourself, acquiring professional help is always an option.
Vinyl floor installations seems like too complicated job?
Contact usGet a Fantastic Handyman for flawless results!