Vertical blinds are a product that has been present on the market for quite some time, yet they still remain in style and popular among homeowners in Australia for several reasons. By simply sliding out of the way, vertical blinds are a classic choice for large windows and patio doors. Moreover, if privacy and shade are key components when choosing blinds for your home, then the vertical option would be an ideal solution.
Luckily, the vertical blinds installation is a very straightforward process. You can easily handle it by yourself, as long as you have the necessary tools and time. In this article, we will describe in detail how to install vertical blinds and tell you everything you need to know before tackling the task.
Step-by-step vertical blinds’ installation:
Vertical blinds’ specifics
Vertical blinds resemble lengths of fabric, also known as vanes, louvres or slats, attached to a sliding track. They are weighted down to ensure that all pieces are evenly distributed and joined together by a chain at the bottom. The vanes can tilt and turn depending on how much privacy and light you are looking for. At the same time, they can also be drawn back completely to let more sun get inside the room.
Vertical blinds come in different colour schemes, patterns and textures. They can be made of various fabrics and materials, such as PVC or vinyl, and adjusted to any window space, even to windows with non-standard sizes. Additionally, these shades boast excellent thermal efficiency and low maintenance, as the vertical slats don’t collect as much dust as the horizontal blind options.
A stylish modern alternative to vertical blinds is the panel glide blinds. This refers to fabric panels that are very efficient in terms of securing complete privacy and light blockage. They are a great choice if you want to avoid direct sunlight and hide in the shade. Although usually installed on large windows and sliding doors, they can also be used as room dividers.
Before installing vertical blinds, you have to decide on an inside or outside mount. This will determine the final appearance and also play a role in how much light sweeps through.
With an inside mount, the blinds are fit inside the window recess, on the frame itself. It creates a more minimalistic appearance and allows more light to penetrate. On the other hand, with an outside mount, the blinds are installed on the architrave or the wall over the window. The benefit here is creating the appearance of a larger window, yet securing better light blockage.
How to properly install vertical blinds
How you hang vertical blinds can slightly differ depending on the design and the mount option you have chosen. Still, the installation consists of several key components that correspond to pretty much all vertical blinds’ models.
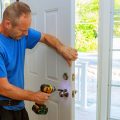
In this section, you will find what tools and blind parts you need to seamlessly conduct the task, along with a simple step-by-step guide on how to install vertical blinds. However, if you think you don’t have the necessary skills or time to hang vertical blinds, you can always consider seeking professional help.
Tools and blind parts:
- Measuring tape
- Pencil
- Spirit level
- Power drill
- Impact driver
- Screws
- Brackets
- Headrail
- Vanes
- Child safety device
- Valance and valance clips (optional)
- Safety glasses
Step 1: Decide on an inside or outside mount
The decision of whether to go with an inside or outside mount is best made even before purchasing the blinds. Outside mounting requires larger sized blinds for better window coverage, while inside mounting needs a more precise measurement to ensure that the blinds fit perfectly on the window frame.
Generally, an inside mount is recommended when the window recess is deep enough for the blinds to be installed. Alternatively, if your window recess is shallow or there are certain obstacles like window cranks and handles that may interfere with the operation of the blinds, opt for an outside mount.
Step 2: Measure the area the blinds will cover
Once you’ve chosen the mount style, you will need to measure your space. If you’ve decided on an inside mount, take your measuring tape and determine the dimensions of your window or sliding door by measuring the recess from edge to edge. If you’ve decided on an outside mount, measure the same way, but add about 5 centimetres on each side for full window coverage.
Step 3: Mark the spots for the brackets
You will need to mark down the spots where the brackets will go. This will be either on the window frame, for an inside mount, or on the architrave/wall, for an outside mount. Use a measuring tape to make sure that the marks are flush.
Step 4: Drill the brackets in
Pre-drill the holes through the marked spots. Then, screw in the brackets. We recommend using an impact driver for easier screwing and more firmly attached brackets.
Use your levelling device to make sure the brackets are properly positioned and levelled. This step is important for an outside mount, but it can be skipped for the inside mount, as the window frame is usually already levelled.
Step 5: Fit the headrail into the brackets
To hang the headrail, you will need to place the front of it into the front groove of the brackets. Tilt the back of the headrail up until it clicks into the brackets’ back. Depending on the length of your window and the headrail, you may need an extra pair of hands for this step.
Step 6: Hook up the curtain pieces (vanes)
Now, you are ready to hang up the vanes. It doesn’t matter which way they will face, as long as all pieces face the same direction. To hook them up, push the ends of the vanes into the plastic clips. After attaching a vane, carefully tug it down to ensure that it has fallen into place correctly.
Step 7: Add the blind wand and the child safety device
Hang the blind wand on the headrail. Install the child safety device, according to the manufacturer’s instructions. Make sure you mount it high enough so that the children in the house cannot access it.
Step 8: Test your new blinds
Finally, test your freshly installed blinds to be sure they are tilting and turning seamlessly. Use the blind wand to draw them back. The vanes should be in an open position when you are sliding them back and forth. Otherwise, you can damage them.
Takeaways
- Vertical blinds are versatile, thermally efficient, and enable excellent privacy and light control.
- Since they can be conveniently tailored to any window size, vertical blinds are an ideal solution for large windows or sliding doors.
- The blinds’ installation is a straightforward task that can easily be turned into a DIY project.
You don’t have the time to hang your vertical blinds?
Contact Fantastic Handyman for professionally installed blinds!
You can book our handyman services in Melbourne, Sydney, Brisbane and Perth!