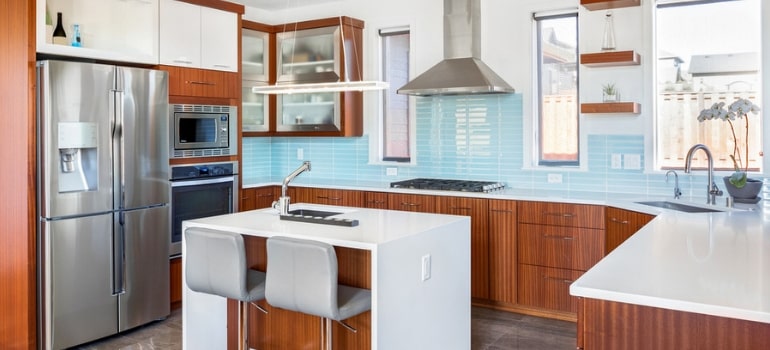
A splashback is not only a design solution for your kitchen, although it serves this purpose as well. A kitchen splashback is a needed feature in your cooking area to prolong the good appearance of the walls and prevent moisture and dirt from damaging them.
In this guide, we’ll teach you how to tile your kitchen splashback, how to prepare properly before tiling and everything else you need to know about tiling your splashback.
Advantages of a tiled kitchen splashback
Kitchen splashbacks are a popular solution for every kitchen no matter the style of it. Not only do they make your kitchen look amazing, but they also have numerous functional advantages.
- They come in a variety of colours, sizes and patterns and can fit every design.
- A properly installed splashback will protect the kitchen walls from moisture damages or splashes from cooking accidents.
- Tile splashbacks are chemical resistant, which makes them easy to clean and can even soundproof your kitchen.
- Splashbacks are scratch resistant although they can get scratched if abused.
- You can build an expensive or a cheap splashback.
Tools and materials you’ll need to tile a splashback
Set all of the tools and materials you need to use near you. Tiling can get dirty, that’s why it’s a great idea to prepare some rags and buckets with hot water.
Tools
- Safety glasses
- Dusting mask
- Protective gloves
- Tape measure
- Screwdriver
- Masking tape
- Pencil or marker
- Sandpaper
- Spirit level
- Notch Trowel
- Tile Cutter
- Rubber mallet
- Putty knife
- Damp Sponge
- Rubber grout trowel
- Caulking gun
- Bucket
Materials
- Tiles
- Tile Spacers
- Tile Beads
- Mastic/Adhesive
- Tile grout mix
- Caulk / Silicone
Prepare the area for tiling
Before starting to tile the splashback you need to take some important things into consideration first.
Step 1: Take measures
After you decide on the type of tiles you’ll use for the splashback, the next important step is to measure the area. Use a tape measure and measure the width and the height of the space you want to cover with tiles. To calculate how many square meters of tiles you’ll need, multiply the length by the width of the area.
Measure the size of the tiles and the tile spacers as well. Calculate how many tiles you’ll need to cover the length of the area. Don’t forget to include the spacers measures.
Usually, they’re 1.5 mm in width but don’t make assumptions, measure them yourself. Repeat the procedure for the width of the area as well. You can keep a 4 mm gap on the external side for caulking later. Write them down on a piece of paper to make it easier for you.
Step 2: Clear the area
If there are outlets or light switches in the area, you need to remove their plastic covers using a screwdriver. Place each cover with its screws in a plastic bag to avoid losing or meshing them up. Place a plastic cover or cloth over the floor, benchtops, furniture and appliances near the area. Cover the edges of the cabinets on the wall with masking tape to protect them from being dirtied with caulk or grout.
Step 3: Prepare the wall
Tiles need to be installed on a clean, smooth and dry surface. If the wall is damaged, you need to repair it prior to the tiling. Use sandpaper to rub the area until it’s smooth and even. Sanding will also redound that the tiles will stick perfectly on the wall.
Step 4: Support the tiles (Optional)
If you don’t have gaps between the area where you’re planning to tile the splashback, you can skip this step.
If you don’t have support for the splashback, it’s a good idea to prepare to use tile beads on both sides of the area. You can also drill a piece of timber on the area to support the tiles.
How to tile a splashback step-by-step
After making sure the area is properly prepared you need to start tiling the splashback.
Step 1: Plan the tile design
Sketch the tile design on the area. Figure out how many tiles can fit horizontally and vertically. Use a pencil to mark the centre of each side of the area. Determine whether you need to use partial pieces and, if yes – where you need to place them.
Don’t cut any of the tiles yet. Just set them aside. After putting the whole pieces, you may find that the size of the partial pieces needs to be slightly different than you planned. Map with the pencil where you plan to place each tile.
You can skip this step if you decide that it’s time-consuming, but having a proper plan, in the beginning, will assure that the splashback will be tiled perfectly.
If the tiles have different colours or patterns, lay all the pieces together on a large surface or the floor. This way, you’ll be able to plan and match the tiles to achieve the desired look and avoid mistakes.
Step 2: Prepare the mastic
Mastic is an adhesive that is used to stick tiles to walls or floors. To make the tile mastic qualitative, pour the mixture into a bucket and add a little warm water.
Put a dusting mask on your face and stir the mixture until it has the consistency of toothpaste. If it’s thicker than that, repeat adding water until you achieve the desired consistency.
Step 3: Spread the mastic on the wall
After mixing the mastic, use the notched trowel and apply a layer thick around 1-1.5 mm of it on the wall. Start from the bottom of the splashback. Apply enough mastic to lay the first row of tiles.
Step 4: Layer the first row of tiles
Apply mastic on the back of the tile and lay it on the centre of the first row and around 1 mm above the benchtop. Use a spirit level to be sure that the tile is straight. Press it firmly to the wall and place tile spacers at each side of the tile.
Add two more tiles on both sides of the first one. Press them firmly and add tile spacers on their sides as well. Continue working your way to the external sides of the area, repeating the procedure.
Laying the first row evenly will give you the foundation for the next rows, so it’s important to check frequently if the row is levelled and correct any mistakes.
Step 5: Install tile beads
After laying the first row, attach the tile beads on both sides of the area. This will be the support for your splashback if you have a gap between the splashback. Apply mastic and press the beads firmly to attach them to the wall.
After laying the tile beads successfully, start with the second one repeating the procedure and work your way up. Don’t think about the partial pieces yet. Make sure that the whole piece is installed first.
Step 6: Cutting the partial pieces
After laying the whole tiles, use a ruler to measure the left space’s horizontal and vertical. Remove the metric of the tile spacers. This is the size you need to cut your tile. Mark the tile with a marker or a pencil on the bottom side.
Take the tile cutter and place the tile face up. Make a test run, leaving around 1 cm more on the tile to ensure that the cutting wheel will run along the line. Run the cutting blade once again along the line of the tile. After you remove the tile apply a little pressure to break it. When you lay it on the splashback, make sure to position the cut edge outside the splashback.
Repeat the procedure and keep tiling the rest of the splashback.
Step 7: Remove excess adhesive
Once the tiles are installed, tap them gently with a rubber mallet to make them stick tight on the wall. Use a putty knife and scrub the tiles gently to remove any access mastic from the tiles. After that, take a damp sponge or cloth and rub the tiles with it. Leave the tiles for around 2 hours and go back to remove the tile spacers.
Leave the tiles for 24 hours at least to make sure they’re dry before continuing with grouting. You can check the manufacturer’s instructions of the mastic for a specific drying time.
How to grout and caulk a kitchen splashback
Grout is the substance used to fill the joints between the tiles formed because of the tile spacers during the installation. Grout is relatively difficult to maintain. It can get dirty or mouldy in wet areas. The kitchen splashback is constantly exposed to moisture because of the constant cooking and cleaning. That’s why you need to waterproof it with caulk.
Step 1: Prepare & apply the grout
Add the grout mix to a bucket and pour water. Stir until you get a smooth consistency of toothpaste. Use a rubber grout trowel to spread grout onto the joints of the tiles. Apply extra grout to make sure all of the gaps are filled. Remove excess grout as you work with a damp sponge. This will make it easier to clean once you’re done.
Don’t fill up the space between the tiles and the counter or appliances. This will be filled with caulk.
You can use the top of a pen, pencil, or other round edge object to shape the grout. Run the object along the grout lines. This will also help to fill any air gaps in the joints.
Step 2: Clean excess grout
After you’re done grouting, run a damp cloth or sponge along with the tiles again. Wipe up in back and forth movements and rinse the sponge often to ease the process. Continue cleaning until you remove all excess grout from the joints and tiles.
Step 3: Caulk the edges of the splashback
Caulk the edges between tiles and cabinets and benchtops. Use a caulk that matches the colour of the grout you’ve used. Use a caulking gun and squeeze the tube slightly to push out enough caulk to fill the gap.
Use a round edge object or your finger, damped in water and run it across the line with a little pressure to shape the caulk. Clean any excess caulk with dampen cloth or sponge.
Leave the caulk to cure completely to prevent moisture and leakages inside the splashback and avoid damaging it. The process of curing takes approximately 24 hours, but it’s recommended to check the instruction on the package.
Cleaning a kitchen splashback
A tiled splashback needs proper and regular care as you also have to consider the grout. Clean and wipe the surface off after every cooking to prevent dirt from accumulating and polluting the grout. Wipe out the surface frequently with a dry cloth to make sure you remove any moisture from the splashback.
How much does it cost to tile a splashback
The cost of installing a tiled splashback depends completely on the style, size, pattern and colour of the tile you’ve chosen to use and on the sizes of the area you want to tile.
Splashbacks need to be properly waterproofed and installed. Although installing it is a relatively easy job, it’s a good idea to hire professionals to do the job for you. This will ensure perfect results and a long-lasting and beautiful splashback complimenting your kitchen design.
Need help with tiling your splashback?
Hire a professional handyman to do it for you!


