An interior door is an important part of your home. It’s the focal point of a room’s style, and it’s the first thing your guest will see after entering your house.
A door should be elegant, practical, and welcoming. It should snap into its latch, lock properly, close perfectly and swing easily on its hinges, and even go with your interior. That’s why you need to take care of your doors regularly and resolve issues, repair and rehang when needed.
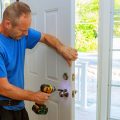
Hanging a new door should be done precisely and it can be a challenging task for any DIY specialist.
We at Fantastic Handyman gathered our professional knowledge and prepared a detailed guide on how to choose, install and maintain an interior door.
In this article:
The height of a standard door in Australia is usually 204 cm. If the doorways in your house have different sizes, you may need a custom-made door to make sure it will fit perfectly.
How to choose the right type of door
When choosing an interior door for your home, you need to consider the functionality and the sizes of the door. A door should complement the style of the whole house and serve its purpose at the same time.
Door sizes
Doors are manufactured in three standardised dimensions – width: 68,6cm, 76,2 cm and 83,8cm.
Door materials
- Wooden doors can add classic and warm feel to your home. They can be found in different styles and colours. However, wooden doors can be pricey and are not energy-efficient. They require regular maintenance as the wood can rot or warp if not well protected from moisture.
- Steel doors are more energy-efficient and far less expensive than wooden doors. A steel door helps reduce heating and cooling costs as it can keep the room temperature for a longer time.
Steel is long-lasting and very easy to maintain. Exterior steel doors will also provide extra security to your home. That’s why they’re suitable for exterior doors. However, exposed to outdoor conditions, the door needs to be painted and maintained to prevent rusting. - Fibreglass doors are energy-efficient and can resist different weather conditions.
They are filled with insulating foam. Because of this, they provide at least five times the insulating qualities of wood doors.
Fibreglass doors can be created to imitate wood or steel. This type of door can also be customized by size, can be easily painted and also provide extra protection against dents and scratches.
Door styles
Doors can be found in different colours and designs. Before selecting a style for your front door you should consider the overall look of your home.
Consider if you want decorative ornaments to complement the door and your house’s exterior and if yes, what type of decorations matches well. You can also consider adding decorative glass and beautiful and durable exterior hardware.
Door hardware
An important part of the door is its hardware such as handles, doorknobs, knockers and peepholes.
Door hardware is usually made of brass, bronze, copper or stainless steel.
The type of hardware you pick should be in line with the door type and should match the nearby hardware around the room or the exterior of the house.
Tools you’ll need to hang a door by yourself
- Tape measure
- Nails
- Hammer
- Pliers
- Screwdriver
- Grub screws
- Metal-cutting jigsaw
- Chisel
- Pencil
- Electric drill
- Drill bit
- Spade bit
- Panel saw
- Sanding paper
How to remove your old door
Step 1: Make sure the door is properly closed
Start by closing and latching the door. Make sure the door is secured so it won’t fall down when the last screw is removed from the hinges.
Step 2: Remove the hinge pin
Loosen the hinge pin by using a nail and a hammer. Put the nail on the bottom of the hinge and tap lightly with the hammer. Keep taping until the pin comes out enough that you can pull it out with pliers or by hand.
Step 3: Remove the door hinges
When all pins are removed from the hinges, the door won’t be held by anything. Lift the door slightly to remove it from the hinges.
Place one of your hands under the hinges and the other one on the door handle. Open the door2 partially and pull it to one side to drop out of the hinges. If you’re planning to use the same door hinges for your new door, don’t remove them from the door jamb.
Step 4: Unscrew the hinges from the door
To completely remove the hinges from the door, simply unscrew them from the door. If you’re planning to use the same hinges for your new door you don’t have to remove them from the door frame.
Step 5: Remove the door jamb
The door jamb is tightened to the framing with screws, nails or bolts. First, use a screwdriver to lose the jamb by unscrewing the bolts. Inspect the door frame to see how the jamb is attached to the framing. If it’s attached with wood screws, use an electric drill to unhitch the screws. If it’s attached with nails, you’ll need to use pliers to remove them.
How to store the old/removed door
If you don’t plan to use the door you just removed, you need to store it properly. It’s much easier for a door to get damaged if it’s outside the door frame. Store the door lying down completely flat in a dry place. Don’t put anything on top of it to prevent the door from warping and scratching.
How to remove door frame
If you want to remove the framing, you should do it after the door is removed. Take a flat screwdriver and a hammer to push the frame of the wall.
Start working from the top of the frame. Place the screwdriver between the wall and the frame and start hammering until the screwdriver slips between the wall and the trim.
Proceed losing up the trim on different spots. When the bigger part of the frame is loosened up, use your hands to pull it away.
Need help with replacing your door?
We can do it for you professionally!
You can book our handyman services in Melbourne, Sydney, Brisbane and Perth!
How to fit the new door
Measuring the new door to size
First, measure the door opening, width and height. If the old door was matching perfectly to the door frame you can use it to measure how big the new door should be. Lay the old door on the floor and place the new one on top of it.
If the new door is bigger, use a pencil and mark where you need to cut it. If you’re using your old door frame, measure the positions of each hinge and mark the centre positions where you need to attach them to the door. If you don’t have an old door you can use, hold the door up against the frame and measure precisely.
How to cut a door to fit the doorframe
If your door needs cutting, take an equal amount of material from both top and bottom, especially if you need to cut more than 1 cm. Use a panel saw to cut the door and then use sanding paper and smooth the door.
How to install door hinges
Door hinges should be installed properly and positioned correctly as this is the main thing that supports the door and prevents it from breaking on the ground.
The most popular door hinges in Australia
The most popular type of hinge for interior doors in Australia is the butt hinge. They’re constructed by two matching leaves of metal connected with a pin. One part of the hinge is attached to the door jamb with screws, and the other one is attached to the door.
The butt hinge is manufactured in numerous types of metals – from stainless steel to brass and copper.
A step-by-step process of installing door hinges
Step 1: Measure the hinge position
After cutting the door to fit the door frame, hold the door up. Place 20 cent coins on each side to create an equal gap around the door. Measure the recesses between the top and bottom hinge. Place them on the door and trace with a pencil their spots.
Step 2: Install the hinges on the door frame
Skip this step if you’re planning to use the same hinges for your new door.
To install the door hinges in the framing, you’ll need a chisel and a hammer. Use the chisel to remove the excess wood around the pencil marks. Tap gently with the hammer and remove the wood. Place the hinges and check if they fit perfectly in the holes. Continue to remove wood until they fit. Screw the hinges with screws.
Put the door in place and mark with a pencil where the top and bottom hinges should go. Don’t forget to leave a gap at the bottom of the door.
Step 3: Install the hinges in the door
Use a pencil to mark where the hinges should go. With the help of a chisel and a hammer, outline the hinge shapes. Check if the hinges fit correctly and repeat the procedure until they do. Drill holes for the screws and tighten the door hinge with a screwdriver.
How to fit the door handle
Step 1: Measure the position for the door handle
To make your job easier you can measure the height of the handles of the other interior doors in your house and use the metrics. Or you can use the standard height of the door handles which is 105 cm off the floor. Trace the outlines of the handle with a pencil.
Use the provided template from your manufacturer, which comes with the door handle kit and mark the spots where you’ll drill holes. Make sure to mark both sides of the door.
Step 2: Drill holes in the door
Drill pilot holes in the door on the front, back and side of the door.
Don’t drill holes more than 2 mm, as this might cause the wood from the opposite side of the door to splinter.
After drilling the pilot holes, insert a bigger drill bit and use it to make the holes larger. Attach 25mm spade bit to the drill and drill holes for the spindle for both front and back of the door. Make a hole in the side of the door barrel
Step 3: Mark the faceplate
Insert the door latch into the holes you’ve drilled in the side. Place the faceplate on the door and trace around it with a pencil. Use a chisel and a hammer to cut around the outlines. If the latch doesn’t fit properly, drill a bigger hole until it does.
Step 4: Install the striker plate
Close the door and mark on the frame where the middle of the barrel is. Hold the striker plate in the centre of the door latch. Mark the top and bottom of the plate on the frame with a pencil.
Drill holes on the marked places in the framing. Hold the striker plate against the frame and make sure the holes fit. Trace around the plate with a pencil. Use a chisel and hammer and cut around the recess between the outlines. Place the striker plate back in place and drill holes for the screws. Use a drill to tighten the screws in the holes.
Step 5: Install the handles
Remove the faceplates from the handles and insert grub screws into the smaller holes you drilled earlier. Insert the bolt into the larger hole. Put back the faceplate on one of the handles, but before attaching it make sure the handle turns in a motion.
Place the handle in place, insert a screw into one of the grub screws, and slip the handle over the door barrel. Tighten the screws on the top and bottom and repeat the same procedure with the other handle.
How to hang the door
After installing the hinges, put the door in the frame. When you’re assured that the door striker is working properly and the door swings effortlessly, combine the different hinge parts with the pins. Place the pin on the top side of the hinge and tap lightly with a hammer until it’s placed to the bottom.
Close the door and take a good look at it. If the door is not hanging correctly, loosen up the screws of the hinges.
If the door is not placed on the centre of the door frame, you’ll need to remove the door, measure and sand off the wood until it’s even from all the sides.
How to rehang a door to open the other way
If you have remodelled your home recently and now the door can’t open properly because of a large piece of furniture, you can fix this by rehanging it to swing the other way.
Measure the positions of the hinges and cut holes in the door jamb on the opposite side. To keep the door swinging in the same direction, you can change the position of the swing from left to right.
Step 1: Remove the door and the hinges.
If you haven’t removed your door yet, go to How to remove the old door.
Step 2: Install the hinges in the opposite direction
Put the door in the door frame standing up and measure the exact position where the hinges were and place them back on the door, but this time in the reverse direction.
Mark where the nails should be with a pencil and use an electric drill to install them on the door. Repeat the procedure and mark the spots for the hinges on the door frame. The pins in the hinges must still point to the top of the door.
Step 3: Install the doorknob
Remove the doorknob. Measure its previous position and trace with a pencil where it should be installed.
Separate the front from the back and as you change its position, insert the doorknob reversed. Install the strike plate on the door as well. Tighten the screws with a screwdriver or electric drill.
Step 4: Screw the door
Place the door in the opposite direction of the framing and attach the new hinges with the pins.
Step 5: Mark the knob striker
Close the door and check out if everything works fine. Colour the end of the knob striker with a pencil. While the door is still closed, use the doorknob several times. When opening the door, you should find marks on the door jamb, left from the pencil.
Step 6: Install the strike plate in the door jamb
Drill a hole at the centre of the mark. Use an electric drill and make a 1-2 cm deep and 3cm wide hole, depending on the size of the strike.
Remove the strike plate from the opposite side of the door, place it centred to the hole and trace with a pencil. Use chisel and hammer. Gently tap the chisel with a dept around 3 mm around the inside of the traced template.
Position the chisel at a 45-degree angle and continue to tap it with the hammer to remove the wood in depth around 3 mm. Cut holes with a drill and tighten the plate with screws.
How to maintain a door
To ensure the prolonged life of your newly installed door, it’s best if you do regular inspections. Check if the door is squeaking, sticking and if the closing and locking mechanisms work properly.
Oil the hinges regularly and check for any signs of rust onto the door hardware. Check if the knobs turn easily and if the latch fits correctly.
Moisture can rot the doors. If you notice dark streaks into the wood, a clear sign of moisture builds up into the door. Repair the problem as soon as you notice it, as this can damage the paint and swell the door and make it impossible to close correctly.
Check the door framing for cracks and small holes and repair immediately if you notice any damages.
Leave door installation and repairs to the professionals
Hire the Fantastic handymen to fix any door problems you might have
You can book our handyman services in Melbourne, Sydney, Brisbane and Perth!