Installing floating shelves on the walls is a good and relatively easy way to add more storage space in your home, expose beautiful accessories and add personality to any room.
But with plaster being one of the most common materials for walls in Australian homes, you may encounter some problems with the mounting process. Over time, plaster dries, and the screws that have to be used for support may damage the plaster wall irreversibly. Opting for smaller screws can result in your floating shelf collapsing on the ground.
Continue reading to learn how to mount floating shelves properly.
What you need to know about plaster walls
To mount your floating shelves properly, you’ll have to understand how plaster walls are made.
Plaster walls are made of fine wood lath. They are nailed across vertical wall studs. Then, the plasterboards are pressed onto the pieces of the lath board. This way, the plaster is held tightly in place.
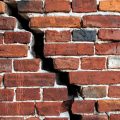
Plaster walls can chip and get damaged easily, which makes it difficult to drill into them.
Tools you’ll need
- Stud Finder
- Pencil
- Ruler
- Shelves bracket
- Electric Drill
- Level
- Drill bits
- Screws or nails
- Toggles
- Wood screws
- Screwdriver
How to find studs in the plaster walls
After deciding what size of shelving you want to install on the wall, you need to figure out the position. Plaster walls have studs. When installing brackets on plaster walls, the ideal solution is to drill and attach them directly to the wall studs. This will ensure the secure position of the shelves.
To locate the wall studs use a stud finder. This device can detect wires, pipes, electric boxes or screws inside of the wall, so you can know where to drill in the wall without damaging the electrical or plumbing installation of the house.
Studs are usually positioned between 40-60 cm from each other. Most of the electrical boxes are placed on the studs. If you don’t have a stud finder, you can use a strong magnet. It works amazingly well for finding nails and screws holding the plaster on the wall studs.
How to install floating shelves
Step 1: Choose the right shelves type
Determine what you’ll use the shelves for. If you plan them to hold heavier items, you should choose thicker shelves. If you plan to have more storage space, choose longer ones. Make sure they’re wider enough to anchor both of the ends on the wall studs.
Step 2: Choose the location
Once you have defined the exact position of the wall studs, decide on what height and the weight you want your shelves to be. Be sure to mark both the studs’ edges and the exact place where you’ll be drilling. Plan to position the brackets over the centre of the studs for extra security.
Step 3: Take measurements
Place the bracket against the wall at the location where the shelves would be installed. Use a level and adjust the position of the bracket until it’s perfectly vertical. Use a pencil and mark the holes where you’ll be drilling to mount the brackets on the wall.
Step 4: Drill holes
First, drill pilot holes through the plaster on the marked positions by using the smallest drill bit you can find. This will prevent the plaster from cracking and will make the drilling of the larger holes easier.
Next, use a slightly bigger drill bit, but make sure it’s still a bit smaller than the screws of the brackets. This will guarantee the shelves are tight on the wall. If you’re not drilling on the wall studs, first install wall goggles to screw the screws in them. To install the wall goggles, first drill a pilot hole as well. After that, tighten the goggle on the wall.
Step 5: Mount the brackets
Usually, the wall brackets come in the shelving packaging. If that’s not the case, consult with the manufacturer to recommend the best brackets for floating shelves. Position the brackets on the wall. Use a level to make sure the brackets are vertical and screw the wood nails until they’re fixed safely and securely.
Step 6: Mount the shelves
Once the brackets are installed on the wall, slide the shelf through the bracket tubes. Place the level above the plank to ensure it’s perfectly vertical. Make adjustments until you achieve the desired effect.
Step 7: Secure the shelves
Usually, there are holes on the bottom of the shelves. Screw and tighten the shelves to the bracket using wood screws to ensure its safe position. Make sure the screws are smaller than the shelf so you don’t screw through the surface.
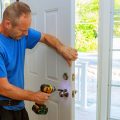
We can help you with your floating shelves!
Book a handyman to mount your new shelves professionally
You can book our handyman services in Melbourne, Sydney, Brisbane and Perth!
Takeaways
Installing floating shelves on plaster walls does not sound like a hard job, but it can have a negative outcome if not done properly. If you’re not sure about your DIY abilities, you can trust our professional handymen to hang the shelves for you and improve the look of your home.