Do you have trouble with groundwater or poor drainage in the backyard? Then, you’ve come to the right place because we have an effective solution. A French drain can help you transfer water away from your property, protecting the foundation of your home and improving the health and look of your yard.
But first, let’s explore further the specifics and purpose of a French drainage system. Read on!
What exactly is a French drain?
The main purpose of French drains is to collect surface water and groundwaters and divert it away from the foundation of your home to prevent moisture seeping into the house. They are usually set up simultaneously as a new house foundation is built if the area is known to have an abundance of groundwater.
French drains can be installed both around the foundations or under the basement. The second is usually done when moisture is expected to creep into the house through the basement floor. The pipes laid under the basement capture the water before it reaches the foundation and leads it away.
French drains, which are often called weeping tiles too, were originally trenches filled with rocks or gravel to divert water by providing it with a path of least resistance. French drains do not come from France but were invented in the sunset years of the 19th century by the American lawyer Henry Flagg French who apparently was also an avid farmer. The first designs didn’t feature a pipe at all, but instead, roof tiles arranged peculiarly. Needless to say, the modern designs are not at all as prone to being clogged with soil and roots.
Nowadays, french drains are built with a pipe perforated on the bottom to increase the volume of water that can flow through them. This minimises the risk of soil clogging up the space between the rocks, which was a common issue with the original design. Landscape fabric is also used to protect against this, making it possible to grow turf above the french drain.
Alternatively, weeping tiles can be used to:
- Improve the drainage of your garden in an efficient and inconspicuous way.
- Relieve pressure on retaining walls caused by groundwater.
- Lead water away from roads and driveways
French drain variations
In order to make the best choice for your home and garden, it’s also good to explore the different French drain variations out there and their specifics.
- Curtain drain – This variation is what we mentioned earlier. The traditional French drain is open so water can use a perforated pipe surrounded by gravel. This variation is similar to the traditional French drain, the difference being that the traditional is open so water can clearly flow into the gravel. The curtain drain has a lair of soil atop that can be used for turf or planting.
- Collector drain – It combines groundwater drains and surface water runoff. Filters must be installed on the drains that collect surface water to prevent the underground pipes from clogging. This is an efficient way to quickly divert rainfall or any water runoff from the surface to underground plumbing.
- Fin drain – The drainpipe has a fin extending above it. The fin is made of draining composite and sucks up moisture from the ground, delivering it to the pipe it extends from. These are the most advanced types of French drains and are actually cheaper to build as both the pipe and the fin cannot be clogged by soil, and thus the need for backfill material is reduced. This naturally saves both time and money when building the drain.
Create the home of your dreams with ease!
Hire professional handymen for renovation, odd jobs, plumbing, electrical repairs and more!
You can book our handyman services in Melbourne, Sydney, Brisbane and Perth!
How is a French drain installed?
Important steps before you start:
- Consult the municipality and get familiar with the state’s regulations to find out if they allow such a project to be done in your backyard and the appropriate channels to run it through. It may be annoying to deal with bureaucracy sometimes, but it’s worth doing it the right way and avoid legal actions later on.
- The complexity of the project, combined with the property’s location and specifics play a significant role, too. Installing a shallow French drain in your backyard may not be as challenging as laying such a system around the foundation of your house or beneath the basement. In either case, though, proper planning needs to be done for the success of the project and this is best done by a certified professional. The latter will also ensure there are no running power lines or piping through the installation spot.
- Consider whether your french drain will be bothersome for your neighbours. Groundwater runoff in another person’s property can give them grounds for legal action against you. Ideally, a runoff area away from any buildings and private property is ideal. A specialist can advise you on that matter, as well.
- For the drain to work, the piping should be sloping at a 1° angle. If there is no natural sloping, an artificial one can be created. If you are not sure how to do this yourself, again it’s best to hire a professional surveyor.
And now, let’s look into the specifics of a French drain’s installation. If you are already considering hiring professionals for the job or you are just curious about the laying process, then, hopefully, the following instructions will give you an idea of what to expect.
Needed tools and materials
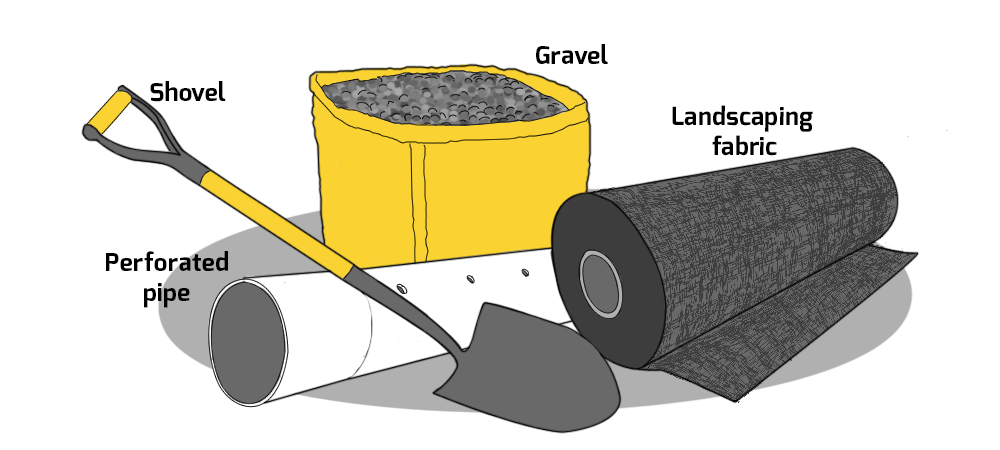
- Shovel – This, of course, is the bare minimum, and it may be backbreaking labour digging an entire trench by hand. Hiring an operator and a backhoe is also an option.
- Gravel – The gravel used for the project must be washed. The tiny particles sticking to it may end up in the drain pipe.
- Perforated pipe – The size of the pipe will vary depending on how severe the drainage problem is. There are flexible varieties too, but their durability is lower, and they tend to be more difficult to unclog should the need arise.
- Landscaping fabric – It will keep soil, roots, and other small debris from clogging up the pipe. There are specialised pipes that come with a landscape fabric “sock” built up into the design.
Step 1 – Digging up the trench
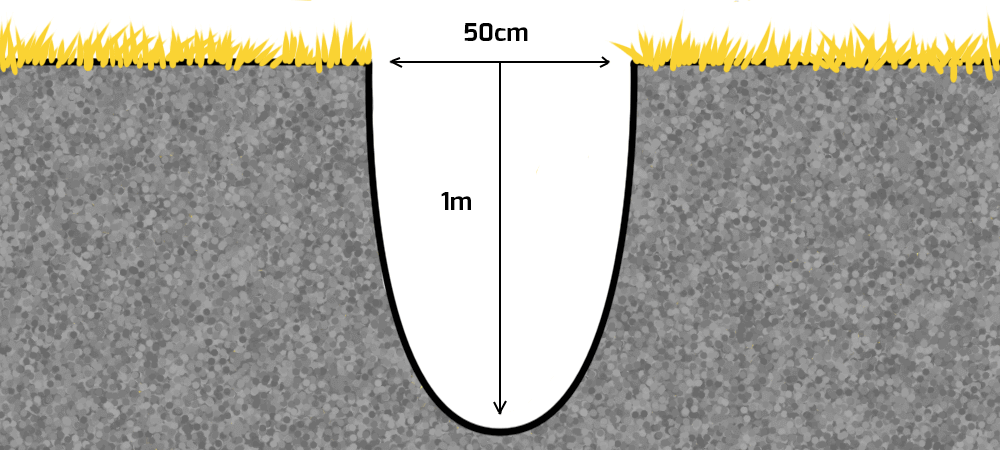
A trench needs to be dug for the french drain. The size is not set in stone and can vary depending on the functionality.
A deeper trench would work best for groundwater draining, while rainwater will drain more easily if the drain is closer to the surface. The trench should not have any grooves and bumps as these will cause water to pool in them and prevent the proper drainage.
Step 2 – Lining with landscaping fabric
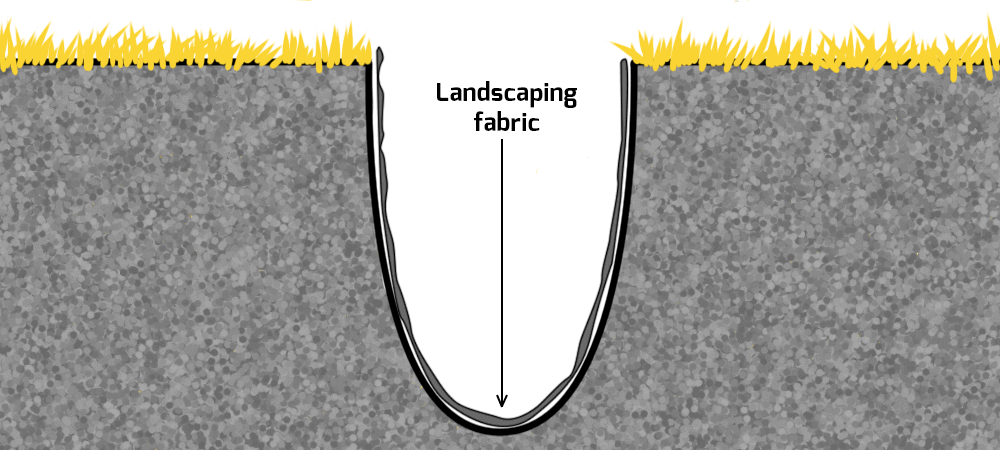
The landscaping fabric will permit water to go through it but will prevent any soil and small particles to be washed into the drain’s holes. If the particles get into the drain and reach the pipes, they may clog them.
This is an important step, which should not be skipped. Using a high-quality fabric is best, as such products can last longer.
Step 3 – Making a gravel bed
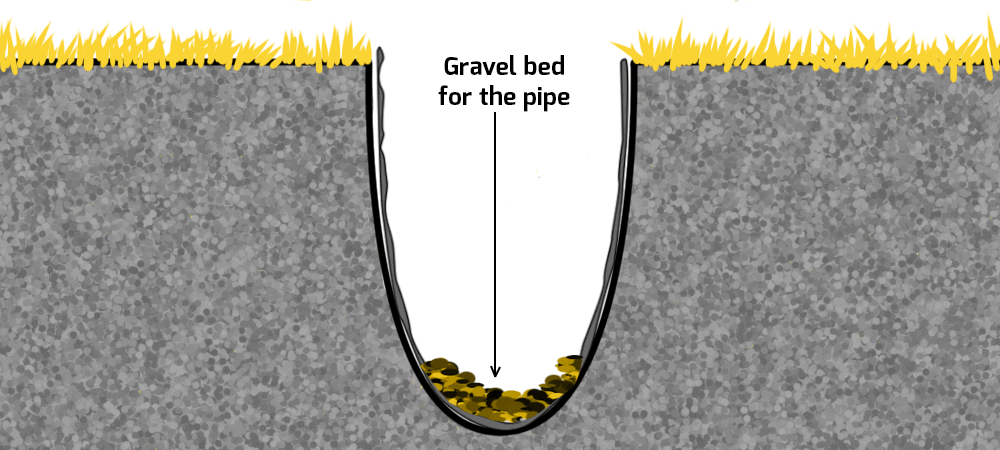
Around 5 centimetres of gravel needs to be placed over the landscaping fabric to prepare the pipe’s “bed”.
Step 4 – Laying the pipe
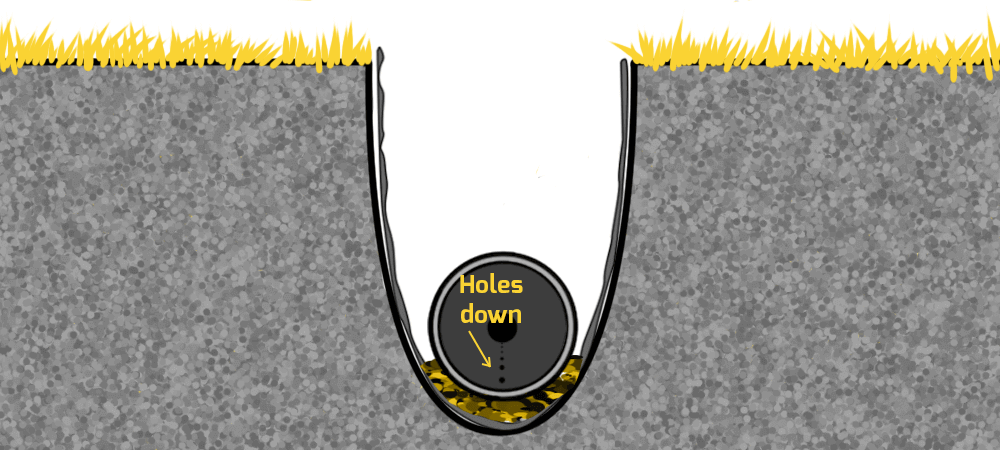
Next comes the laying of the pipe. When this is done, the pipe’s holes must be pointing down. This may sound counter-intuitive, however, it is also the best approach. If the pipe’s holes are pointing up, some of the water will get into them, but most of it will pool beneath the pipe. Water always chooses the path of least resistance, and a French drain’s purpose is to provide one for it. The water will “climb” through the holes of the pipe and follow it to the runoff spot.
There are different types of pipes, some of them punctured all around the pipes’ diameter. A specialist can advise you on the best one for your specific project.
Step 5 – Filling in gravel
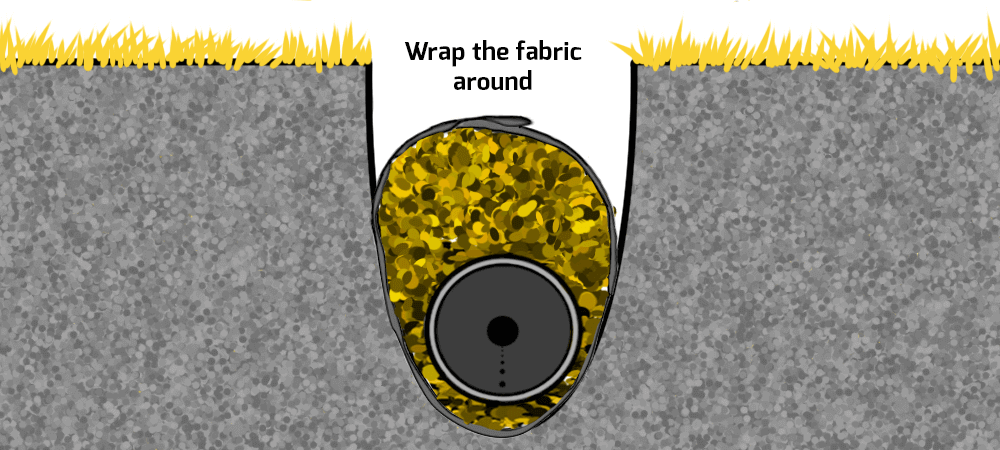
The gravel needs to be shovelled over the pipe until it almost fills the trench. It’s important for some space to be spared, so soil can be put back in. Then, the landscaping fabric is wrapped around the pipe and gravel. This way, the french drain is protected from small particles from all sides.
Step 6 – Final touches

Finally, a decision needs to be made for the remaining space. It can either be filled with gravel, which will make rainwater draining easier, or filled with soil. The latter will allow for some turf to be planted over it.
The point of wrapping the drain with landscape fabric is to minimize future French drain maintenance and ensure you won’t have to change piping for at least a few years. This also means that if you choose to plant turf above the drainage system, it won’t be disturbed for quite some time.
French drain maintenance tips
While such a drainage system does not require a lot of maintenance once installed correctly, it’s still good to keep the following in mind:
- Regularly check for signs of damage or clogging.
- Pay attention to the condition of the soil, as well as the runoff spot for debris and leaves collection.
- Cleaning, repairs or pipe replacement may still be necessary at certain point. French drains are most often cleaned with the help of an elexctric sewer snake. As for repairs and more serious work, digging up the trench again will most likely be necessary. While inconvenient, it is essential to do be done for the effectiveness of your dainage system, especially when it helps protect your home’s foundation from groundwater.
Takeaways
- French drains help collect and transfer groundwater, as well as surface water away from your property.
- Before you begin an installation process, it is very important to check the laws in your area for whether you are permitted to build such a drain in your backyard and how to do it legally.
- It’s also good to consult with a professional regarding the project’s planning, execution and whether the project will affect already established pipes or power lines, as well as your neighbours and their property.
- French drains are low-maintenance, so an occasional cleaning should be sufficient and will not take a lot of time. Repairs, on the other hand, will be a bit more time-consuming.